Okay, so I'm majorly overdue for a new post! Let's just say things have been more than crazy in my life for a long time. And because of this, I really haven't done very much sewing. I really miss it too, as it is a big stress reliever for me.
Anyway, I had wanted this to be done in January, and to be able to make a second one for my older daughter. But, that's not going to happen because while the rest of the country still seems to be stuck in winter, Colorado is gearing up for Spring, and all our snow has been gone for almost a month! Little one's are in need of springtime clothes now, not winter ones.
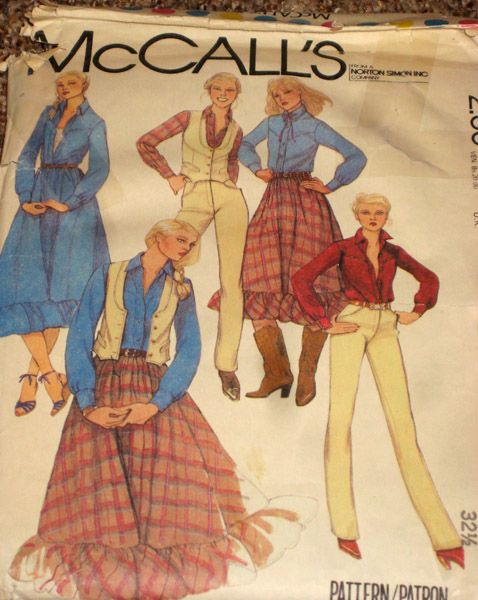
I used an out of print McCalls pattern this time. Knowing how huge Big Three patterns tend to come out, I made size 1 for my 21 month old. The length is perfect, but the shoulders are still huge to the point that one side is always trying to fall off.
I didn't have matching buttons, so I found some coordinating ones in my stash, and am very happy with how they look.
The pattern was very easy to put together, and once I started working on it, I was able to get it finished very quickly.
This little one absolutely loves snowmen, so I knew she'd love this dress. She asked to wear it two days in a row, and would have worn it again if it hadn't been dirty!
The flannel was given to me, and I'm still in awe of just how perfectly the pieces fit on it. I couldn't have made a bigger size if I had wanted too!
Hopefully, you'll be seeing more posts coming up soon as I have a lot of sewing I need to get done this spring before #3 arrives in June. :)
Showing posts with label Clothing. Show all posts
Thursday, March 6, 2014
Friday, July 12, 2013
Making a Victorian Blouse for a Movie
I recently had the opportunity to make a Victorian blouse for my husband's film. The film is titled "In His Steps" and is a modern day adaptation of the classic of the same name by Charles Sheldon. Even though the film takes place in the modern day, one of the characters, Jasper Chase, is an author and in the middle of writing a book that takes place in the 1890's. My husband, Zack thought that showing a scene from Jasper's book in the film would also be a great way to homage the time period of the original book.
Naturally that meant making period costumes! Unfortunately, our budget did not include buying an authentic pattern. Our Art Director, Carol decided to make the skirt and underskirt, so I could concentrate on the more visible in the film blouse. First thing to do was go through my supplies. I had this really pretty wide lace that I found right off and really wanted to use. I also found some other narrow laces, but those didn't end up working out. Carol found me some white calico at Joann.
Next was to come up with a style. These were my inspiration images found searching Pinterest.
I really liked the lines of this first one, and tried to replicate them as close as a could with the base pattern I had on hand. And the second one below gave me the idea of what to do with the lace. And also that the sleeves didn't have to be super full.
And here's the pattern I used for the bodice and neckband. I raised the neckband two inches, and put a single line of gathering at the waist in the front and center back similar to the first inspiration image. For the sleeves, I used Sense & Sensibility's Regency dress sleeves with the extra fullness option. Before sewing the sleeves to the bodice I pulled up the gathering stitches, tied them in place, then based the lace over them. I was trying to give the sleeves the appearance of being fuller than they really were. But it didn't really work.
So I bet you're ready to see my finished product now right? Well, let me warn you that it is by no means an authentic representation. Sorry to burst your bubble. Zack says that any historical discrepancies can be attributed to Jasper's lack of research into the time period. I can go with that! Also, I did not do the final ironing of the blouse. If I had, there would not have been creases on the sleeves.
This first picture is the only full length picture I have of the actors. And they had already changed out of their period shoes! All well.
This one shows the gathering on the front of the bodice the best. Since these pictures were not taken to show the work of the clothing, I didn't get any of the back.
Our lovely actress, Laura Seabrook.
I hope you enjoyed this! Please let me know what you think of it. And be sure to check out the movie's website too! www.inhisstepsmovie.com
Naturally that meant making period costumes! Unfortunately, our budget did not include buying an authentic pattern. Our Art Director, Carol decided to make the skirt and underskirt, so I could concentrate on the more visible in the film blouse. First thing to do was go through my supplies. I had this really pretty wide lace that I found right off and really wanted to use. I also found some other narrow laces, but those didn't end up working out. Carol found me some white calico at Joann.
Next was to come up with a style. These were my inspiration images found searching Pinterest.
I really liked the lines of this first one, and tried to replicate them as close as a could with the base pattern I had on hand. And the second one below gave me the idea of what to do with the lace. And also that the sleeves didn't have to be super full.
And here's the pattern I used for the bodice and neckband. I raised the neckband two inches, and put a single line of gathering at the waist in the front and center back similar to the first inspiration image. For the sleeves, I used Sense & Sensibility's Regency dress sleeves with the extra fullness option. Before sewing the sleeves to the bodice I pulled up the gathering stitches, tied them in place, then based the lace over them. I was trying to give the sleeves the appearance of being fuller than they really were. But it didn't really work.
So I bet you're ready to see my finished product now right? Well, let me warn you that it is by no means an authentic representation. Sorry to burst your bubble. Zack says that any historical discrepancies can be attributed to Jasper's lack of research into the time period. I can go with that! Also, I did not do the final ironing of the blouse. If I had, there would not have been creases on the sleeves.
![]() |
| Rachel Winslow (Laura Seabrook) & Jasper Chase (Samuel Carr). Photo by Mary Roe. |
![]() |
| Photo by Mary Roe. |
![]() |
| Photo by Mary Roe |
![]() |
| Photo by Mary Roe |
Sunday, April 28, 2013
Our Wedding Dresses
So my sister-in-law was wed yesterday. It was a beautiful ceremony. Almost everything went without a hitch, the only hiccup that the announcements were made before the groomsmen could get back out to escort the special guests out. No one would ever know just how close it was to get a certain bridesmaid's dress finished.
However, before we get to that, let me talk about the girls' dresses. If you will recall from this post, I had been planning for some time to make the Regency dresses from the Sense & Sensibility pattern. Since I knew I wouldn't be getting the fabric for the dress for a while I decided to make the girls' dresses first. I started them back in February, I think. I was able to find a really nice 100% cotton at Wal-Mart of all places. My mother-in-law was kind enough to let me borrow her serger so I could even finish the seams! I wasn't able to get them finished until the beginning of last week however, because we just moved on the first and it took a while to get my sewing stuff back out again. I'm so glad I made the elastic version of the dress. It is so much easier to fit a growing girl, especially when starting it several months in advance.
For my 2 year old daughter I added a grosgrain ribbon tie belt. I really like how it dressed up the dress. You would never guess how hard it is to get a full body picture of a toddler during the busy-ness of a wedding!
I have a spool of the purple grosgrain ribbon somewhere, but neither my husband, mother, or I could find it in the few days before the wedding. The ribbon I used for the belt had been sitting out along with a shorter piece. The second piece was too short to make a matching belt for the baby, so I used it to make her a headband. My mom made the flower while we were at the rehearsal.
I love how the difference makes their dresses different, yet still the same.
And now for the story of my dress. Originally I had planned on making myself a Regency dress as well. I wanted to alter the front to make a nursing opening. However, after several changes with the other bridesmaids I realized that if I made a Regency dress, then I'd be the odd girl out in the line up. The other 3 dresses were all modern styles and lines. So about 2 weeks ago, (yes, you read that right) I opened the box that has my patterns in it and found Simplicity 2926. I bought it about 4 years ago, always wanting to make it, but didn't have a reason to until now. Only problem is that it is not nurse-able.
However, since Miss Bubbles is almost 11 months old, my mom suggested that if I nursed her right before the ceremony I'd have a really good chance of not needing to nurse her again for several hours.
I made view C with view A's sleeves. There were 2 reasons I did this. One, I didn't think the sleeves for C would quite work for a bridesmaid dress; I really didn't want a seam down the center of my sleeves. And I figured with my time constraints that simpler was better! I did lengthen them about an inch and a half though. My mom also showed me how to make my own piping when she got here on Tuesday. I can't believe how easy it is!
I can't say that I constructed it all by myself though. Alas for two littles who are constantly needing mommy for something! While I nursed the baby, my mom worked on the dress. It was finished Friday afternoon. My mom was ironing it when the girls and I left for the rehearsal!
And now I'm sure you'd all like to see the lovely bride. She is wearing a dress that was first worn by the groom's great-great grandmother in 1908. It was the dress of her dreams and only needed the tiniest bit of altering to fit her!
The happy couple! Don't they just look so sweet together?
However, before we get to that, let me talk about the girls' dresses. If you will recall from this post, I had been planning for some time to make the Regency dresses from the Sense & Sensibility pattern. Since I knew I wouldn't be getting the fabric for the dress for a while I decided to make the girls' dresses first. I started them back in February, I think. I was able to find a really nice 100% cotton at Wal-Mart of all places. My mother-in-law was kind enough to let me borrow her serger so I could even finish the seams! I wasn't able to get them finished until the beginning of last week however, because we just moved on the first and it took a while to get my sewing stuff back out again. I'm so glad I made the elastic version of the dress. It is so much easier to fit a growing girl, especially when starting it several months in advance.
For my 2 year old daughter I added a grosgrain ribbon tie belt. I really like how it dressed up the dress. You would never guess how hard it is to get a full body picture of a toddler during the busy-ness of a wedding!
I have a spool of the purple grosgrain ribbon somewhere, but neither my husband, mother, or I could find it in the few days before the wedding. The ribbon I used for the belt had been sitting out along with a shorter piece. The second piece was too short to make a matching belt for the baby, so I used it to make her a headband. My mom made the flower while we were at the rehearsal.
I love how the difference makes their dresses different, yet still the same.
And now for the story of my dress. Originally I had planned on making myself a Regency dress as well. I wanted to alter the front to make a nursing opening. However, after several changes with the other bridesmaids I realized that if I made a Regency dress, then I'd be the odd girl out in the line up. The other 3 dresses were all modern styles and lines. So about 2 weeks ago, (yes, you read that right) I opened the box that has my patterns in it and found Simplicity 2926. I bought it about 4 years ago, always wanting to make it, but didn't have a reason to until now. Only problem is that it is not nurse-able.
However, since Miss Bubbles is almost 11 months old, my mom suggested that if I nursed her right before the ceremony I'd have a really good chance of not needing to nurse her again for several hours.
I made view C with view A's sleeves. There were 2 reasons I did this. One, I didn't think the sleeves for C would quite work for a bridesmaid dress; I really didn't want a seam down the center of my sleeves. And I figured with my time constraints that simpler was better! I did lengthen them about an inch and a half though. My mom also showed me how to make my own piping when she got here on Tuesday. I can't believe how easy it is!
I can't say that I constructed it all by myself though. Alas for two littles who are constantly needing mommy for something! While I nursed the baby, my mom worked on the dress. It was finished Friday afternoon. My mom was ironing it when the girls and I left for the rehearsal!
![]() |
| My husband and I. |
And now I'm sure you'd all like to see the lovely bride. She is wearing a dress that was first worn by the groom's great-great grandmother in 1908. It was the dress of her dreams and only needed the tiniest bit of altering to fit her!
![]() |
| The bride and her mother. |
![]() |
| The bride and groom. |
Friday, January 18, 2013
Girls Regency Dress for Winter
So, I've been wanting to get the Girls Regency Dress Pattern from Sense & Sensibility Patterns ever since my first daughter was born. With my sister-in-law getting married this Spring I finally had the perfect excuse to buy it!
As I had been told that the dress runs big I decided to make a mock-up first. But I didn't want to go through all the trouble of making a dress that wasn't going to be used, especially since my daughter really needed more winter dresses. So I figured I could do both at once!
Based on my daughter's measurements she was still a size 1, but she's 21 months old, so I wanted to try making the size 2 first. As the purpose of this dress was to check the fit, I thought I'd go ahead and make the slip-on version, with elastic in the neck and waist. So easy! This pattern went together like a dream.
The fabric I choose was from a flannel bed sheet. The print is bigger than I would like, but my pink flannel is buried in a tub under lot's of boxes, and very inaccessible. However, the large print of the flannel actually made it extremely easy to match the plaids! I was also able to cut the skirt out in one piece because of the width of the sheet.
The sleeve pattern is extremely long for such little girls so I had to shorten it for my little Missy. Unfortunately, I shortened it a little too much. I'll be making the short sleeve versions for the wedding, so I won't have to make that mistake again!
I really like the slip-on version, and think I'm going to use that again for the dress for the wedding. I think it will actually work better that way since I'm making several months in advance, and don't know exactly how big my girls will be by the wedding.
She had so much fun with her photo shoot!
As I had been told that the dress runs big I decided to make a mock-up first. But I didn't want to go through all the trouble of making a dress that wasn't going to be used, especially since my daughter really needed more winter dresses. So I figured I could do both at once!
Based on my daughter's measurements she was still a size 1, but she's 21 months old, so I wanted to try making the size 2 first. As the purpose of this dress was to check the fit, I thought I'd go ahead and make the slip-on version, with elastic in the neck and waist. So easy! This pattern went together like a dream.
The fabric I choose was from a flannel bed sheet. The print is bigger than I would like, but my pink flannel is buried in a tub under lot's of boxes, and very inaccessible. However, the large print of the flannel actually made it extremely easy to match the plaids! I was also able to cut the skirt out in one piece because of the width of the sheet.
The sleeve pattern is extremely long for such little girls so I had to shorten it for my little Missy. Unfortunately, I shortened it a little too much. I'll be making the short sleeve versions for the wedding, so I won't have to make that mistake again!
I really like the slip-on version, and think I'm going to use that again for the dress for the wedding. I think it will actually work better that way since I'm making several months in advance, and don't know exactly how big my girls will be by the wedding.
She had so much fun with her photo shoot!
Wednesday, September 15, 2010
Recycled Skirt Redone!
Last April I made my very first recycled skirt. Because I didn't use any kind of directions and pretty much made it up as I went along, I was never very satisfied with it. So I searched around, and finally found this wonderfully detailed set of directions, and as they say, the rest is history!
For a while I was too busy with making other skirts to sell, and life in general to get back to my black gray skirt. But then after I found out that I was pregnant, and started quickly outgrowing my skirts with fitted waists, I realized that I would probably never fit into it again. Or at least, not for a very long time. ;-) Plus, I always need more things in my shop, so it really wasn't that hard of a decision to make.
So I took the whole thing apart and redid it the right way! And this time I gave it 4 panels instead of just the 2. It looks so much better now!

And the back,
I really had to stuff myself in it for these pictures. But I'm really happy with how they came out. My hubby is a good photographer. Here's the Etsy listing for more pictures. I hope you enjoyed reading about this work in progress!
For a while I was too busy with making other skirts to sell, and life in general to get back to my black gray skirt. But then after I found out that I was pregnant, and started quickly outgrowing my skirts with fitted waists, I realized that I would probably never fit into it again. Or at least, not for a very long time. ;-) Plus, I always need more things in my shop, so it really wasn't that hard of a decision to make.
So I took the whole thing apart and redid it the right way! And this time I gave it 4 panels instead of just the 2. It looks so much better now!

And the back,
I really had to stuff myself in it for these pictures. But I'm really happy with how they came out. My hubby is a good photographer. Here's the Etsy listing for more pictures. I hope you enjoyed reading about this work in progress!
Tuesday, July 27, 2010
New Swimsuit/ Part 1 of the Ball Bag

About 2 and a half weeks ago I finally finished my new swimsuit!! I've had the pattern and fabric for about 3 years, but had just never gotten to it. But with an acting job my husband got in Texas I figured there be a pretty good chance of getting to do some swimming, so I'd better get it made! I bought my pattern from Simply Modest Swimwear. As you can see, I made a couple changes to it.

The first thing I did was to give it the slightest V-neck, and add a V-shaped band around the neckline. I also virtually eliminated the sleeves leaving only 1 1/2 inch band around the arm holes.

Both my husband and I are very pleased with how it came out. ^_^

Naturally Guinivere couldn't resist the temptation of the spandex when I was trying to spread it out on the floor. ;-)
__________________________________________________
A couple month ago I was hired by our local school district to copy a "ball bag" that the middle-schoolers use for basket ball practice to store their ball in. It's not really a bag, but no other description seems to work.

The bag fits over a metal stand to give it form with these slits.

The pre-planning part of this just about drove me up the wall. For a fabric choice I selected a heavy weight denim; it wasn't until the school had already delivered it to me that I realized duck cloth would have been a better option. All well, live and learn.
As for the binding... originally I had it in mind to make my own biased tape out of the denim. However two things prevented me from doing this. First off, I was really worried that my machine wouldn't be able to handle that many layers of denim. It would at least be 4 layers, at most 6. When I took my machine in for it's yearly maintenance I asked the guy there and he told me that household sewing machines are only built to sew through 3 layers of denim. The second reason was that I didn't have enough fabric left to make biased tape after cutting out the pieces.
I asked the ladies over at the S&S forum for help and one option that kept coming up was grosgrain ribbon. At first I didn't think that it would be strong enough, but was afraid my machine wouldn't like anything thinker, so finally went wth that. We went to Wal-Mart yesterday and naturally they didn't have any in navy, so I had to buy black ribbon. I hope the school doesn't mind.
Anyway, to finally get to what I actually DID today. :-P

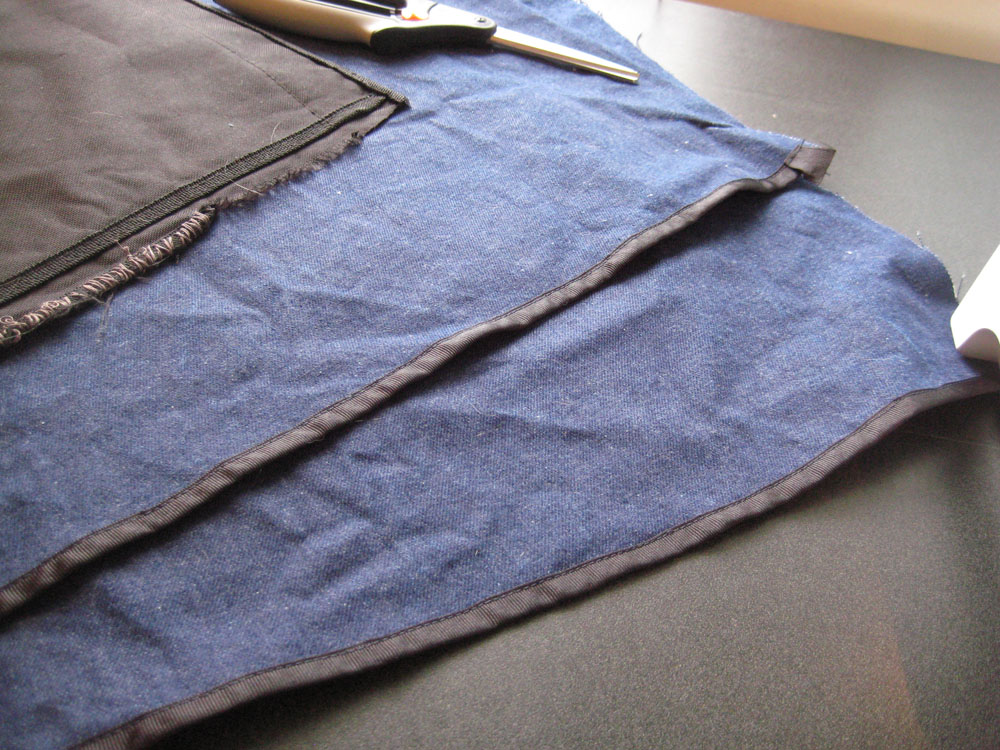
First thing was to enclose the bottom edge of top pieces of the side sections.

Next I sewed one on top of the under piece and made the slits. But alas, a summer thunderstorm overhead prevented me from doing anymore. :(

I hope to update my blog everyday until I get it finished!
Saturday, July 3, 2010
Cargo Skirt
Yesterday I finally finished my new cargo skirt! My orginal plan was to take this pattern, angel it out a little to make it more A-line, then add cargo pockets.

Well, when I got the pattern out I discovered that there was a little problem, inside the envelope there was the directions and the pocket pattern... and that's it. No drawstring or skirt pattern pieces! We're leaving on vacation next week so I didn't really have time to ask my mom to go through her sewing room to look for them and send me, so I thought maybe it was about time I drafted my own pattern! Well, sort of. I measured the largest section of my hips then added 2 inches for the top of the skirt then used a yard stick and pencil to draw all my straight lines.

I still used the pattern instructions for putting it together although not having the pattern pieces I decided to just stick with the cargo pockets and not even attempt the inside pockets. I also wanted to keep the little slits on the bottom of the skirt, though they do begin lower then the original indicated. When planning out how I wanted it to look, I knew I wanted to use heavy duty thread for top-stitching, and that I wanted there to be a row of top-stitching on either side of the side seams. But it wasn't until I started working on it that I realized that if I turned under the entire length of the side seams from the slit on up, I could completely enclose my selvages!!

I forgot to take another close up of the outside after it was sown. But it can be seen in the finished pictures of the skirt.
The draw-sting ended up not working out quite as I had planned. In trying to guesstimate how wide to make it, I guessed too wide. Plus I didn't have enough fabric left over after the second try. Thankfully it's still usable, but inside the casing it's all folded up. :(
Now on to something more fun. The pockets! I wanted to make them look like the majority of cargo pockets seen on store bought clothes. And I wanted them to be big enough to place my hands in. So the first thing I did was measure the length of one of my hands and the width with fingers out stretched. The I added an inch to the width of the pockets plus the selvage extra. When it came to actually putting them together, I still wasn't exactly sure what I wanted. So the first thing I tried was sewing straight down the middle at a half inch.

That didn't work very well. In fact, it looked rather stupid pressed out! So I took it out. But, having two stitching lines 1 inch apart exactly in the middle of the pocket turned out to be just what I needed for my next try! Using that line as a guide I folded under a crease at a quarter of an inch and sewed right down that line!

For the pocket flaps I had another problem. My machine won't stitch heavy duty thread in the bobbin, so I'm limited to only using it for my top thread. But that's not going to work when sewing Velcro. The only way I could figure out to make it work, was to stitch the edges of the Velcro on the inside then, flip it over and use that line for a guide and do the top stitching on the top.


I really like how the finished pocket came out.

For finishing touches I double stitched the hem and bar tacked just above each slit. I'm really pleased with the finished product! I hope this has given you some inspiration to draft your own pattern too! It's really not as hard as you would think. :-)


Well, when I got the pattern out I discovered that there was a little problem, inside the envelope there was the directions and the pocket pattern... and that's it. No drawstring or skirt pattern pieces! We're leaving on vacation next week so I didn't really have time to ask my mom to go through her sewing room to look for them and send me, so I thought maybe it was about time I drafted my own pattern! Well, sort of. I measured the largest section of my hips then added 2 inches for the top of the skirt then used a yard stick and pencil to draw all my straight lines.

I still used the pattern instructions for putting it together although not having the pattern pieces I decided to just stick with the cargo pockets and not even attempt the inside pockets. I also wanted to keep the little slits on the bottom of the skirt, though they do begin lower then the original indicated. When planning out how I wanted it to look, I knew I wanted to use heavy duty thread for top-stitching, and that I wanted there to be a row of top-stitching on either side of the side seams. But it wasn't until I started working on it that I realized that if I turned under the entire length of the side seams from the slit on up, I could completely enclose my selvages!!

I forgot to take another close up of the outside after it was sown. But it can be seen in the finished pictures of the skirt.
The draw-sting ended up not working out quite as I had planned. In trying to guesstimate how wide to make it, I guessed too wide. Plus I didn't have enough fabric left over after the second try. Thankfully it's still usable, but inside the casing it's all folded up. :(
Now on to something more fun. The pockets! I wanted to make them look like the majority of cargo pockets seen on store bought clothes. And I wanted them to be big enough to place my hands in. So the first thing I did was measure the length of one of my hands and the width with fingers out stretched. The I added an inch to the width of the pockets plus the selvage extra. When it came to actually putting them together, I still wasn't exactly sure what I wanted. So the first thing I tried was sewing straight down the middle at a half inch.

That didn't work very well. In fact, it looked rather stupid pressed out! So I took it out. But, having two stitching lines 1 inch apart exactly in the middle of the pocket turned out to be just what I needed for my next try! Using that line as a guide I folded under a crease at a quarter of an inch and sewed right down that line!

For the pocket flaps I had another problem. My machine won't stitch heavy duty thread in the bobbin, so I'm limited to only using it for my top thread. But that's not going to work when sewing Velcro. The only way I could figure out to make it work, was to stitch the edges of the Velcro on the inside then, flip it over and use that line for a guide and do the top stitching on the top.


I really like how the finished pocket came out.

For finishing touches I double stitched the hem and bar tacked just above each slit. I'm really pleased with the finished product! I hope this has given you some inspiration to draft your own pattern too! It's really not as hard as you would think. :-)


Subscribe to:
Posts (Atom)