Showing posts with label modest. Show all posts

Friday, April 18, 2014

Toddler Shirt: Reworked for Modesty

Hard to believe that Hobbit Lass #1 is now 3 years old!  Her birthday was last week.  Being she is the oldest, we have the constant battle of finding new clothes for her each season.  I've got lot's of fabric and patterns, so I could conceivably cloth her myself for free, but unfortunately, don't have the energy or time.  So I was super excited that some relatives wanted to get her some new clothes for her birthday.  However, I have very strong opinions about little girls clothing that they don't share.  One of the shirts that the Lass received had cutouts on the shoulders.

I do not like cutout shoulders at all.  The best way I could think to describe them is teenager-ish and trendy, my husband took the thought further and said it was over sexualized.  The last thing little girls need is to be sexualized, in my opinion.  I had permission to return any of the clothes I didn't like, but I've always had a hard time returning gifts, plus we didn't get the receipt.

So I set out to modify the shirt.  I found a brand new white tee shirt at Salvation Army for only $1.99.  Since the cutouts are small, I only needed the fabric from the sleeves, and now have plenty of white knit jersey for any other projects that come up.
Using a knit to fill in the hole was easiest since I knew it would stretch over her shoulders the right way.  To make it as seamless as possible, I pinned from the top.
Then stitched with white thread as close to the binding as I could get.
After both pieces were sewn on, I trimmed the fabric to about a quarter on an inch.  If I had a serger, I would have finished the seams, but the way it is now, I wasn't sure how well running a zig-zag would work around the edge.
Ta-Da!  Much better looking!  When the Hobbit Lass tried on her new shirt, her comment was that her shoulders wouldn't be cold anymore. :-)
Singing with the ring stacker as her mic.
Now I just need to finish up Hobbit Lass #2's training pants, and try to get at least one sundress made for Lass #1 for summer.  Plus, I'd really like to make Hobbit Lass #3 one new dress just for her, and some more diaper covers for her before she arrives in June!

So what would you do?  Return the garment, or modify it?

Sunday, April 28, 2013

Our Wedding Dresses

So my sister-in-law was wed yesterday. It was a beautiful ceremony. Almost everything went without a hitch, the only hiccup that the announcements were made before the groomsmen could get back out to escort the special guests out.  No one would ever know just how close it was to get a certain bridesmaid's dress finished.

However, before we get to that, let me talk about the girls' dresses.  If you will recall from this post, I had been planning for some time to make the Regency dresses from the Sense & Sensibility pattern.  Since I knew I wouldn't be getting the fabric for the dress for a while I decided to make the girls' dresses first.  I started them back in February, I think.  I was able to find a really nice 100% cotton at Wal-Mart of all places.  My mother-in-law was kind enough to let me borrow her serger so I could even finish the seams!  I wasn't able to get them finished until the beginning of last week however, because we just moved on the first and it took a while to get my sewing stuff back out again.  I'm so glad I made the elastic version of the dress.  It is so much easier to fit a growing girl, especially when starting it several months in advance.
For my 2 year old daughter I added a grosgrain ribbon tie belt.  I really like how it dressed up the dress.  You would never guess how hard it is to get a full body picture of a toddler during the busy-ness of a wedding!
I have a spool of the purple grosgrain ribbon somewhere, but neither my husband, mother, or I could find it in the few days before the wedding.  The ribbon I used for the belt had been sitting out along with a shorter piece.  The second piece was too short to make a matching belt for the baby, so I used it to make her a headband.  My mom made the flower while we were at the rehearsal.
I love how the difference makes their dresses different, yet still the same.

And now for the story of my dress.  Originally I had planned on making myself a Regency dress as well.  I wanted to alter the front to make a nursing opening.  However, after several changes with the other bridesmaids I realized that if I made a Regency dress, then I'd be the odd girl out in the line up.  The other 3 dresses were all modern styles and lines.  So about 2 weeks ago, (yes, you read that right) I opened the box that has my patterns in it and found Simplicity 2926.  I bought it about 4 years ago, always wanting to make it, but didn't have a reason to until now.  Only problem is that it is not nurse-able.
However, since Miss Bubbles is almost 11 months old, my mom suggested that if I nursed her right before the ceremony I'd have a really good chance of not needing to nurse her again for several hours. 

I made view C with view A's sleeves.  There were 2 reasons I did this.  One, I didn't think the sleeves for C would quite work for a bridesmaid dress; I really didn't want a seam down the center of my sleeves.  And I figured with my time constraints that simpler was better!  I did lengthen them about an inch and a half though.  My mom also showed me how to make my own piping when she got here on Tuesday.  I can't believe how easy it is!
I can't say that I constructed it all by myself though.  Alas for two littles who are constantly needing mommy for something!  While I nursed the baby, my mom worked on the dress.  It was finished Friday afternoon.  My mom was ironing it when the girls and I left for the rehearsal!
My husband and I.

And now I'm sure you'd all like to see the lovely bride.  She is wearing a dress that was first worn by the groom's great-great grandmother in 1908.  It was the dress of her dreams and only needed the tiniest bit of altering to fit her!
The bride and her mother.
The happy couple!  Don't they just look so sweet together?
The bride and groom.

Wednesday, January 12, 2011

Church Skirt

Okay, so back in November my mother-in-law bought me two beautiful skirts, and matching camisoles at a thrift shop. I put together the first one rather quickly, but forgot to take any pictures of it. :-( Hence no blog post before now.

I didn't do anything with the second one until just recently, because I did not have a single blouse or sweater that matched it. But with Christmas came a lovely green sweater that matched perfectly. So I decided I'd better get that second skirt made! Just in time too, as I'm no longer able to fit into the few church clothes that were big enough, for a little while, for my growing tummy. :-D

This skirt took a little extra work beforehand to prep before the maternity panel could be added to it. First off, as we have really cold winters here, I wanted it to be as long as possible, but a little thing called a zipper was in the way. So, the first thing I had to do was remove the zipper. Then stitch up difference. Thankfully the skirt was still wide enough at the hip with closing the zipper opening 2 inches higher.
Next up, the skirt had a very high slit that needed to be fixed. Because both zipper and slit were on the same side of the skirt, the selvages were not serged together. That made my job so much easier! All I had to do was take out the stitching enclosing both sides of the slit, then sew the side seams together!
As you can see, there wasn't much space between the bottom of the zipper opening and the top of the slit opening. Interesting thing too, is that with the slit closed up completely I still have plenty of room for movement. Goes to show just how unnecessary the slit was in the first place. ;-)

The camisole I was using was also a bit stretched out, so I had to take the side seams in a couple of times before it was tight enough to hold the skirt up.
All finished!! I really wasn't that big already, I'm only 6 months along! The camera just made me look bigger. I'm very happy with how it came out, and how well it coordinates with the sweater. Thank you Grandma!!

Monday, January 3, 2011

Recycled Maternity Skirt

About a month ago I was visiting a friend a few hours away, and she decided to give me some materials of her's to make some new clothes for myself with. One of the things she likes to do, is take her husband's worn out pairs of pants and turn them into skirts for her daughters. And she thought I might be able to make some use out of a couple pairs as well.

So I picked out two pairs of khaki colored pants, without a clue as to what I would do with them.

After a couple weeks ideas began forming in my mind, and finally I was ready to take action!

The first thing I did was to cut the legs off at the top.

Next I cut out the inside seams and opened them out to see how much flair they'd give me, as I was thinking of making tulip style skirt.

And of course, what sewing project is complete without a cat? ;-)

It turned out that the legs of the lighter pair of pants were actually narrower than the others. So, that helped with my decision on where they would be placed.

Next I started sewing them together! However, four pant legs in a row makes for a very full skirt. As you can see below. Not mention that because these are mens pants I was working with, they were quite stiff. So, I took in a total of 4 inches at the waist. I was still hoping for a tulip shape to the skirt.

Once I had the waist as narrow as I wanted it, it was time to gather it! For the maternity panel I was planning on using the same method I used in this blog post, but knew the fabric was not going to stretch as much as I would need it too. It was actually a bit harder to gather thick fabric like this than I had anticipated, but I think it came out nice.

All done! It's still a lot fuller then I originally wanted, plus the stiffness causes it to stand out more. But all and all, I'm very pleased with it, and especially love that the thickness makes it really warm!


Best of all, I think I may have just come upon a new product for my Etsy shop! I just need to find some more old camisoles! ;-)

Tuesday, July 27, 2010

New Swimsuit/ Part 1 of the Ball Bag


About 2 and a half weeks ago I finally finished my new swimsuit!! I've had the pattern and fabric for about 3 years, but had just never gotten to it. But with an acting job my husband got in Texas I figured there be a pretty good chance of getting to do some swimming, so I'd better get it made! I bought my pattern from Simply Modest Swimwear. As you can see, I made a couple changes to it.


The first thing I did was to give it the slightest V-neck, and add a V-shaped band around the neckline. I also virtually eliminated the sleeves leaving only 1 1/2 inch band around the arm holes.


Both my husband and I are very pleased with how it came out. ^_^


Naturally Guinivere couldn't resist the temptation of the spandex when I was trying to spread it out on the floor. ;-)
__________________________________________________

A couple month ago I was hired by our local school district to copy a "ball bag" that the middle-schoolers use for basket ball practice to store their ball in. It's not really a bag, but no other description seems to work.


The bag fits over a metal stand to give it form with these slits.


The pre-planning part of this just about drove me up the wall. For a fabric choice I selected a heavy weight denim; it wasn't until the school had already delivered it to me that I realized duck cloth would have been a better option. All well, live and learn.

As for the binding... originally I had it in mind to make my own biased tape out of the denim. However two things prevented me from doing this. First off, I was really worried that my machine wouldn't be able to handle that many layers of denim. It would at least be 4 layers, at most 6. When I took my machine in for it's yearly maintenance I asked the guy there and he told me that household sewing machines are only built to sew through 3 layers of denim. The second reason was that I didn't have enough fabric left to make biased tape after cutting out the pieces.

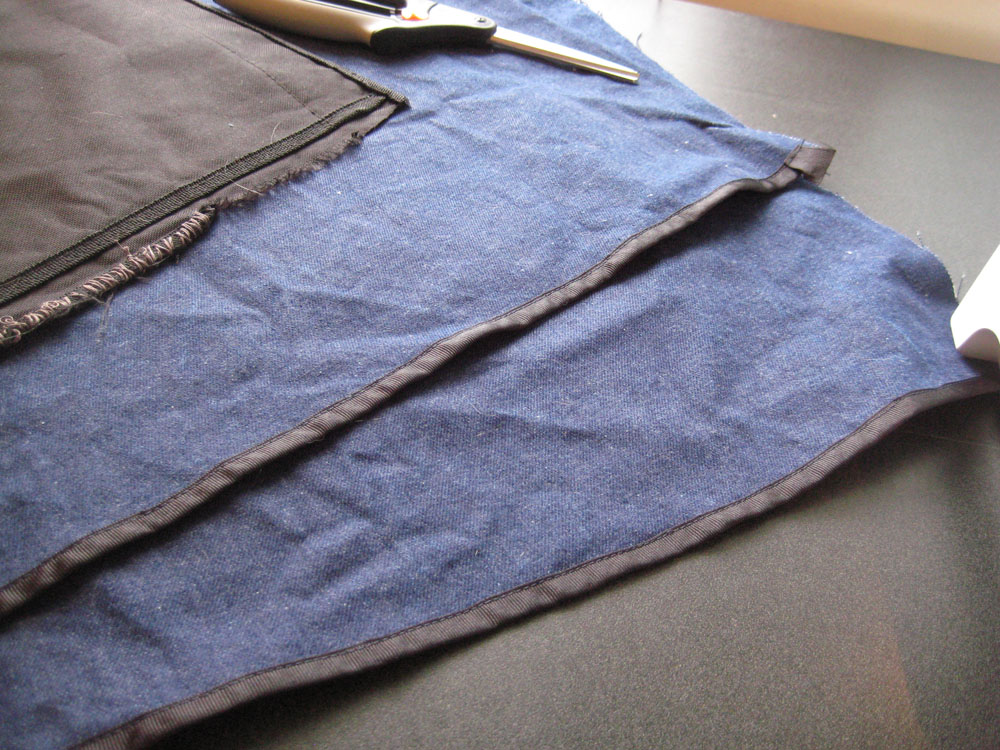
I asked the ladies over at the S&S forum for help and one option that kept coming up was grosgrain ribbon. At first I didn't think that it would be strong enough, but was afraid my machine wouldn't like anything thinker, so finally went wth that. We went to Wal-Mart yesterday and naturally they didn't have any in navy, so I had to buy black ribbon. I hope the school doesn't mind.

Anyway, to finally get to what I actually DID today. :-P


First thing was to enclose the bottom edge of top pieces of the side sections.


Next I sewed one on top of the under piece and made the slits. But alas, a summer thunderstorm overhead prevented me from doing anymore. :(


I hope to update my blog everyday until I get it finished!

Saturday, July 3, 2010

Cargo Skirt

Yesterday I finally finished my new cargo skirt! My orginal plan was to take this pattern, angel it out a little to make it more A-line, then add cargo pockets.

Well, when I got the pattern out I discovered that there was a little problem, inside the envelope there was the directions and the pocket pattern... and that's it. No drawstring or skirt pattern pieces! We're leaving on vacation next week so I didn't really have time to ask my mom to go through her sewing room to look for them and send me, so I thought maybe it was about time I drafted my own pattern! Well, sort of. I measured the largest section of my hips then added 2 inches for the top of the skirt then used a yard stick and pencil to draw all my straight lines.

I still used the pattern instructions for putting it together although not having the pattern pieces I decided to just stick with the cargo pockets and not even attempt the inside pockets. I also wanted to keep the little slits on the bottom of the skirt, though they do begin lower then the original indicated. When planning out how I wanted it to look, I knew I wanted to use heavy duty thread for top-stitching, and that I wanted there to be a row of top-stitching on either side of the side seams. But it wasn't until I started working on it that I realized that if I turned under the entire length of the side seams from the slit on up, I could completely enclose my selvages!!

I forgot to take another close up of the outside after it was sown. But it can be seen in the finished pictures of the skirt.

The draw-sting ended up not working out quite as I had planned. In trying to guesstimate how wide to make it, I guessed too wide. Plus I didn't have enough fabric left over after the second try. Thankfully it's still usable, but inside the casing it's all folded up. :(

Now on to something more fun. The pockets! I wanted to make them look like the majority of cargo pockets seen on store bought clothes. And I wanted them to be big enough to place my hands in. So the first thing I did was measure the length of one of my hands and the width with fingers out stretched. The I added an inch to the width of the pockets plus the selvage extra. When it came to actually putting them together, I still wasn't exactly sure what I wanted. So the first thing I tried was sewing straight down the middle at a half inch.

That didn't work very well. In fact, it looked rather stupid pressed out! So I took it out. But, having two stitching lines 1 inch apart exactly in the middle of the pocket turned out to be just what I needed for my next try! Using that line as a guide I folded under a crease at a quarter of an inch and sewed right down that line!

For the pocket flaps I had another problem. My machine won't stitch heavy duty thread in the bobbin, so I'm limited to only using it for my top thread. But that's not going to work when sewing Velcro. The only way I could figure out to make it work, was to stitch the edges of the Velcro on the inside then, flip it over and use that line for a guide and do the top stitching on the top.


I really like how the finished pocket came out.

For finishing touches I double stitched the hem and bar tacked just above each slit. I'm really pleased with the finished product! I hope this has given you some inspiration to draft your own pattern too! It's really not as hard as you would think. :-)